Pyrrhic Victories and Josekis
PT-BR: Uma versão deste post em português no meu canal será disponibilizada em breve.
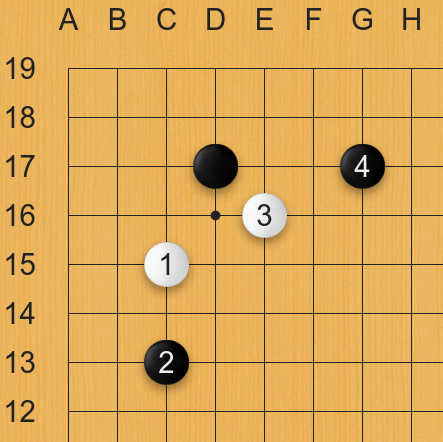
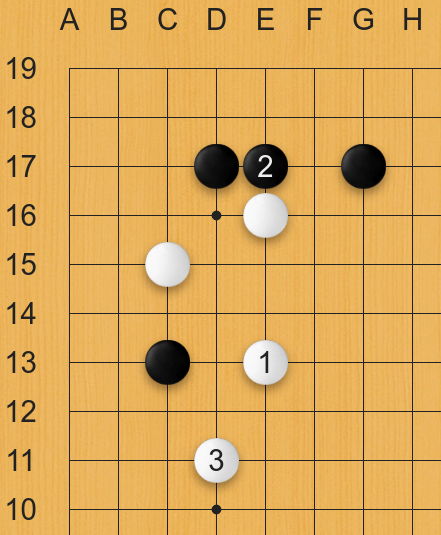
The trick play in question is triggered by the very strange, and arguable mistake, 2-space jump, seen in Diagram 1.
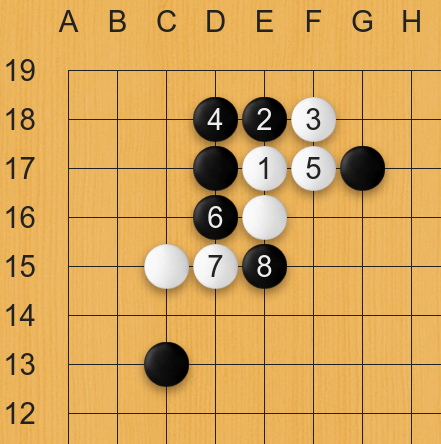
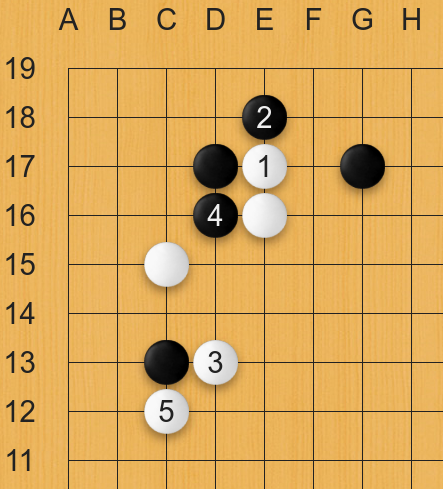
Black's intention is to sacrifice the corner, but make it difficult enough to get an extremely solid wall on the outside. Diagram 2 shows the continuation, in which Black lets himself get enclosed but White's shape starts show its defects.
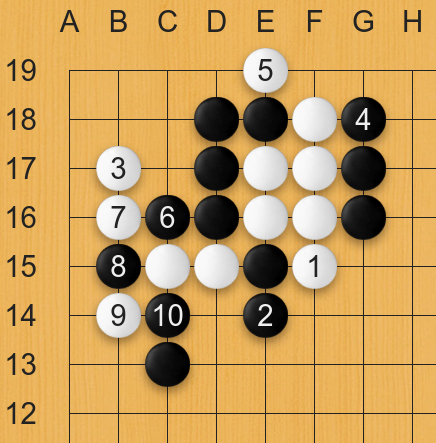
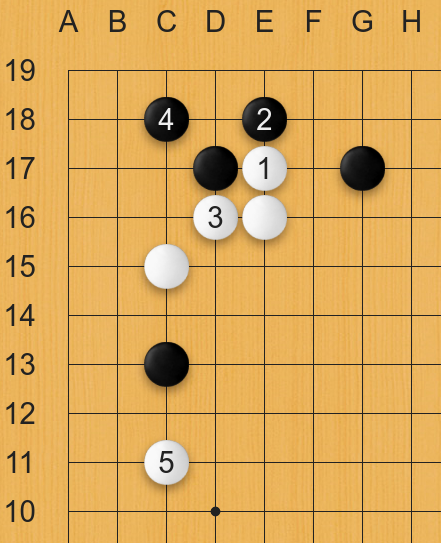
According to Leela, the situation is still good for White, but a lot of care is needed. If you follow through with the "obvious moves", you're falling for the trap, as seen in Diagram 3.
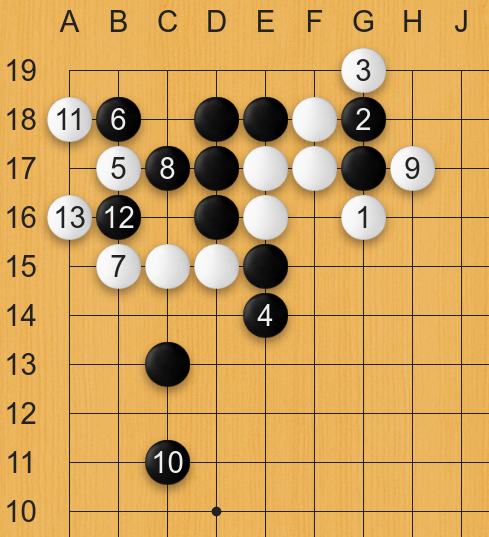
Some more forcing moves and Black is able to net White's group in sente, as in Diagram 4.
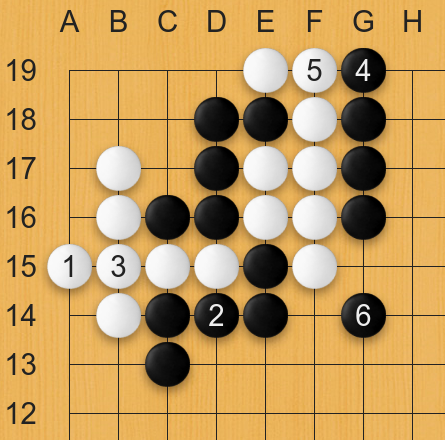
Diagram 5's picture should be burnt into any SDK's mind as the canonical example of why thickness can be worth way more than a big corner. White's territory amounts to approximately 19 points, which is why this sequence is called the Nineteen-Point Trick Play. And Black's wall is sometimes called the Iron Wall. It's also worth mentioning that Black ends with sente, so developing from the wall will be easy.
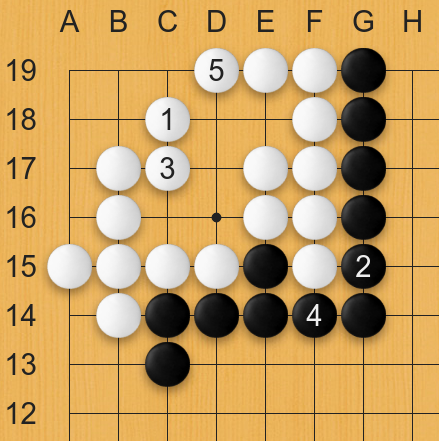
One alternative to White 5 in Diagram 3 would have been to
hane on the outside, shown in Diagram 6. White still gets the
corner, but will be forced to crawl on the second line.If Black ends
up with too little territory in the middle, or around A,
this might be feasible, otherwise it might be even worse than the
normal sequence.
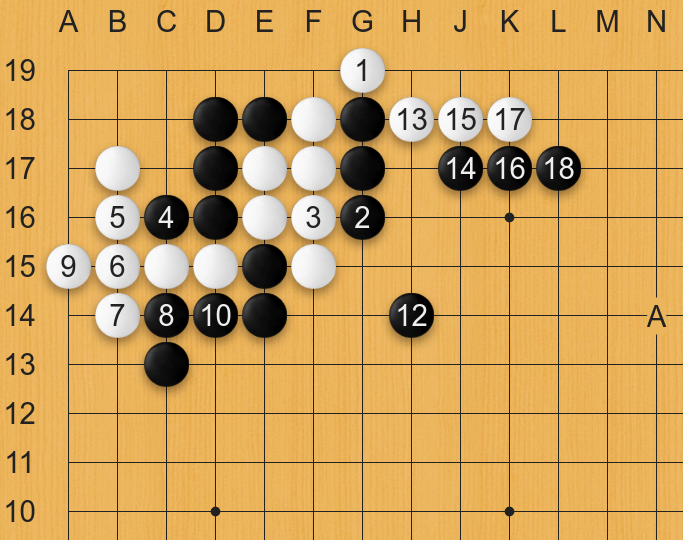
The main way of avoiding the problems of the main trick sequence is to
avoid it right from the start. For example, the main problem in
White's shape is the cut at 8 in Diagram 2, so
why not fix it preemptively? In this case, fixing it even has the
benefit of damaging Black's pincer stone. This rationel is most pros'
recommendation, and is shown in Diagram 7 below.
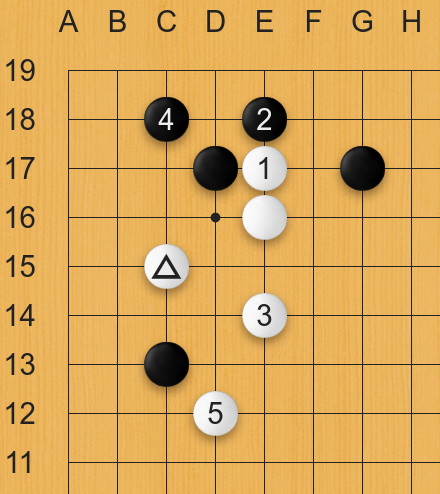
Another way of refuting the trick is seen in Diagram 8.
A final bookish alternative is from, allegedly, one of Inoue Doseki's (1582 - 1630) games, one of the most legendary Go players of all time. In Diagram 9, White attacks the pincer stone in order to obtain enough forcing moves to come back to the trick play much stronger. Black can't fall for this trap and chooses to damage White even further at the top. The overall sequence seems to show a lot of kiai from both players.
As usual, Leela doesn't seem to get fazed by puny human tricks. In
fact, sometimes simple answer to the tricks work unexpectedly well.
This case is no different, Diagram 10 demonstrates an
incredibly simple sequence to refute the trick: White is very thick,
and will be able to counter-attack the pincer stone very nicely. A
complete follow up after 5 is beyond the scope of this
article, but, overall, White will be able to lean at Black's top group
in order to gather strength and counter-attack if Black's pincer stone
starts jumping out.
If you do end up getting cut, there are other, more optimal ways of
resisting for White than the trick play sequence. Move
1 in Diagram 3 is actually quite weird to me,
for instance, it seems to end up helping Black's stones get stronger,
which is almost never a good choice. A move like 1 in
Diagram 11 makes much more sense and is one Leela prefers.
Another alternative to what's played in the trick sequence is simply crawling at the top. This might seem bad, but it isn't because White will damage Black's top stone while getting very solid shape. In Diagram 12, White stabilizes the top, damages Black's stones, and White's stones to the right aren't even captured yet.
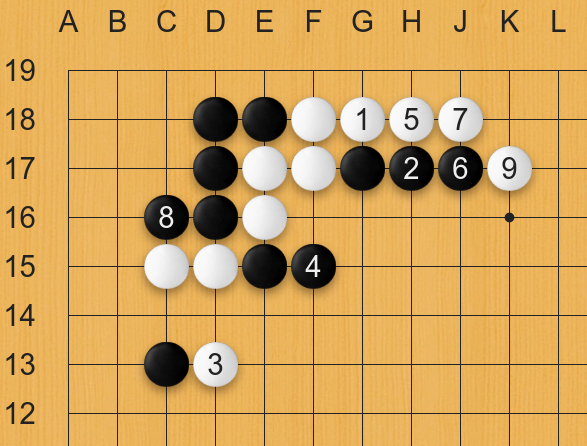
Diagram 13 shows how to "save" White's stones on the left, and is also what Leela considers the immediate best move. Even after Black has played so many moves in the area, trying to trick White left and right, White manages to live, and Black's wal is all for naught.
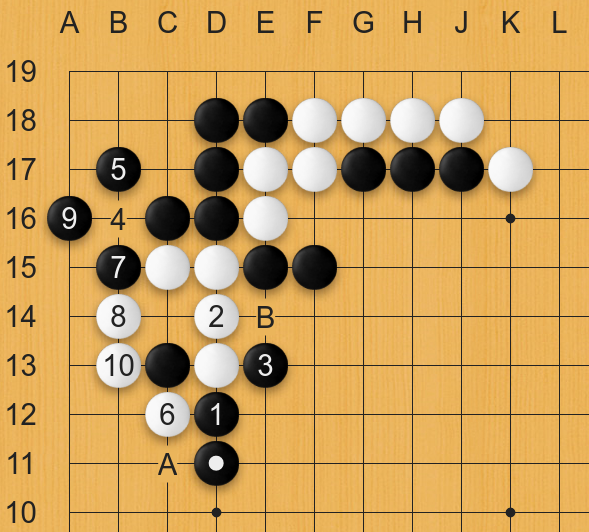
A, White will
first capture and then either live, leaving weaknesses on Black's
shape, or go through Black's "wall" with B. For more
details, please do check out the
SGF.
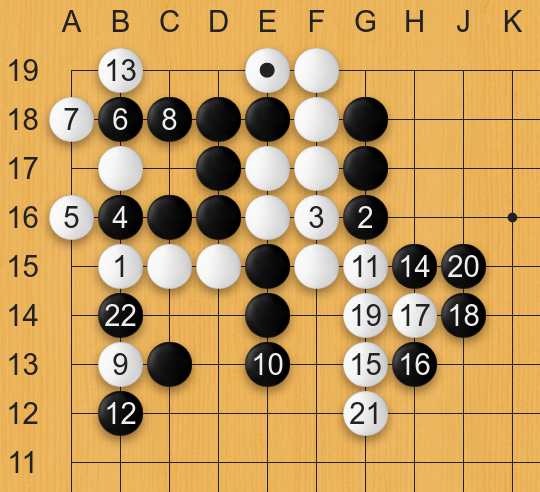
A final variation I would like to show is how Leela would handle the
tricky move of B15 instead of 7 in
Diagram 3. Diagram 14 shows that White is able to
get out to the middle, however Black's shape to the left is thick and
has better eye shape than in the traditional trick variation. In my
opinion, though, this is much better resistance than the trick
variation, which is kind of counter-intuitive because
B16 seems much more solid. At any rate, if you're the
type of player who likes complications, this might be a good way of
tossing the ball back on Black's side, because it surely isn't easy to
cleanly read all the variations for Black.
Here's the complete SGF with all the relevant variations:
You can download the SGF used in this post here. I use Sabaki as my editor, which features some extra blings on the game tree. So, in order to extract the most from my SGFs, I advise you to use it too. Don't forget to donate to the Sabaki project too!
Your browser doesn't support the WGo.js Player. Please use a more modern browser, like Brave, Chrome, Firefox or Edge.
Pyrrhic victories are named after Pyrrhus of Epirus, king and general who thought the Romans on behalf of the Greeks. During the Pyrrhic War, around 280 B.C., he suffered irreplaceable losses at the battles of Heraclea and Asculum.
In both victories, the Romans suffered more losses than the Greeks, however, their pool of replacements was far greater, and Pyrrhus could not afford such overarching losses. After those victories, Pyrrhus is reported, by Plutarch, to have said:
If we are victorius in one more battle with the Romans, we shall be utterly ruined.
How is this related to Go? How is this related to josekis?
To me, this resembles a lot the trick play discussed in the previous section. White is tricked into overinvesting to achieve local victory, even though it might cost exponentially more globally.
Pyrrhus of Epirus was said to have been quite the brash general, too hasty, which might also remind us of our usual first intincts to punish our opponent's abusive plays. Let's have him be a cautionary tale of what this type of behavior might generate in the end, in the grand scheme of things.
Besides Leela and my own 1 dan rationel, here's what I've used to create this article — the numbering below does not reflect any hierarchy at all —: