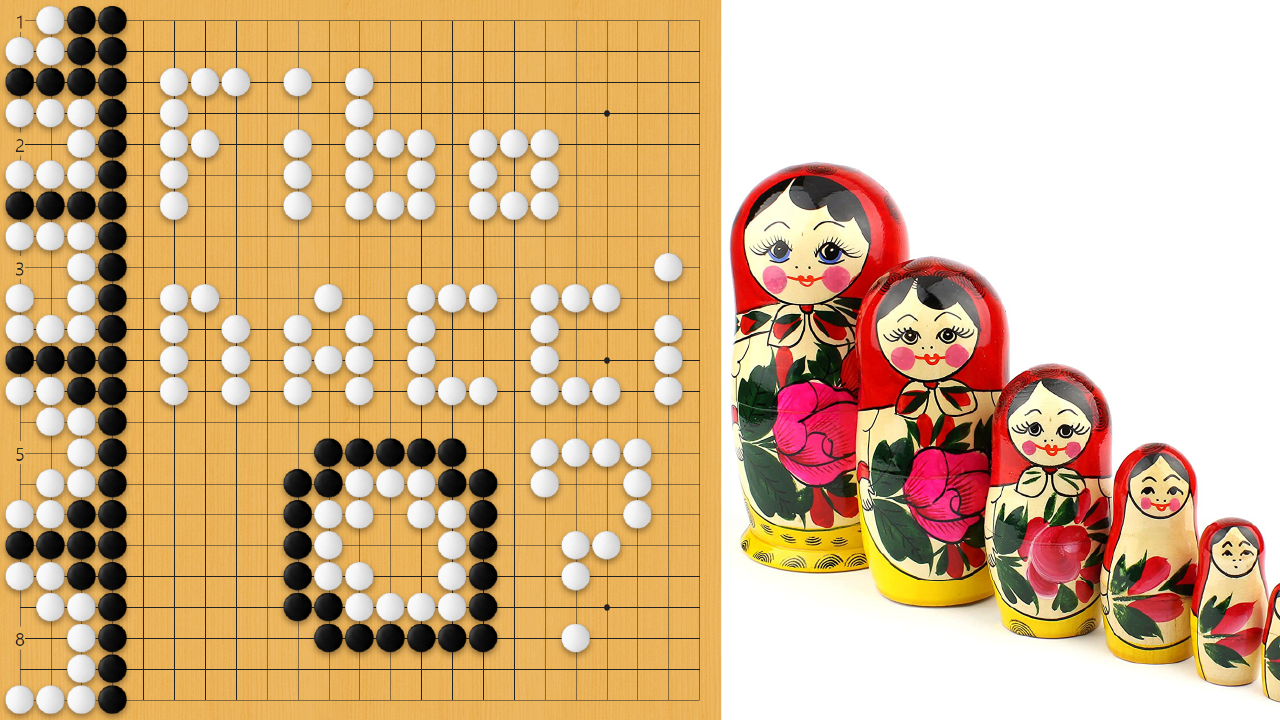
Recursion: Fibonacci in Go?
PT-BR: É possível visualizar a versão em português deste post no meu canal aqui.
Since I'm using a mobile-unfriendly version of LaTeX, you might want to read this article from a computer instead of a smaller device.
The Fibonacci numbers are a sequence in which the next number is the sum of the two previous ones. The two base cases are \[F_0 = 0\] and \[F_1 = 1\], and the overall formula is:
\[F_n = F_{n - 1} + F_{n - 2}\]
So, in the end, we would have a sequence like this:
\[0, 1, 1, 2, 3, 5, 8, 13, 21, 34,...\]
The Fibonacci sequence has many applications
in science and math, but I was very surprised to see it once again in
another topic, the game of Go
More specifically, I've stumbled upon it when facing capturing races
with "big eyes", with recaptures that remind you a lot of recursion,
i.e., a clump of 5 stones becomes a clump 4, then a 3, and so forth.
Usually, fully reading these capturing races is so difficult when also
trying to juggle the whole board in your head that more experienced
players simply say "just remember the 4-stone dead clump has 5
liberties
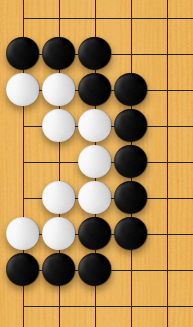
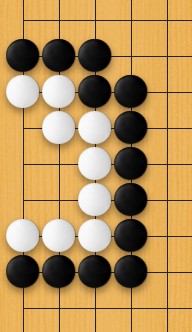
Anything bigger than Nakade #5 will 95% of the time yield either life or seki. And clumps smaller than 4 are much easier to read, and actually have a linear relationship with the number of liberties. So, we are golden, right? Just know 2 shapes by heart and that's it, right? And they follow Fibonacci anyway so just memorize Fibonacci, right? But, wait, do they all really follow Fibonacci? Well, shut up and sit down, s'il vous plaît...
I would say that knowing how to count these weird capture-recapture sequences is necessary if you want to get better at the game. And, perhaps, it will enlighten us with a better system than simply knowing 2 of the most important instances by heart. Besides all that, you will have the extra benefit of being fully confident about what you're doing. At any rate, discussing things has a much higher retention rate than blunt memorization.
Studying the examples below would be much easier with supplemental
material in the form of SGFs, which you can download
With recursion, the easiest way to start — and something math teachers should prioritize — is in fact not by how to get to the base cases, but by only studying the base cases. Once you have them worked out to the bone, then go for how a more complicated use case evolves. So, in our instance of recursion, we start with the 1-stone clump. This one is simple: 1 liberty.
In the second base case, White has two options for following the
throw-in. If she stays passive, Black captures in a total of two
moves. If she captures the initial throw-in at A or
B, Black will next be able to capture the whole thing,
since it only has 1 liberty anyway — and is basically the
previous, 1-stone base case actually. When White captures Black’s
throw-in stone, nothing changes in terms of liberties, but it now
becomes Black's turn instead of White's, meaning the capture
constitutes a mistake because White effectively loses one liberty.
Up to now, these two base cases are very straightforward and don't really show recursion when played correctly.
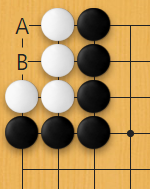
In the third use case, we have the first and, probably, most important
of the dynamics. Black playing A and B can
be followed up by a capture from White; however what's important to
remember is that White's recapture doesn't count as a liberty, as it
doesn't affect the status of anything else. It follows, then, that
B and the subsequent black move in the race should count
as only one liberty, because White has simply reset the position
essentially, making Black simply repeat its efforts.
Summarizing, Black plays 2 moves initially, White captures, Black plays 2 more moves. But Black's first move after the transition overlaps the last one before the transition, being used in the next stage of the recursion, so the final count of liberties is \( 2 + 2 - 1 = 3 \). Another way to look at the transition is that Black's last move before the transition forces White's capture, so, each player having used their turn to play a local move, Black and White's last moves cancel each other out.
It's important to note that capturing at C for White
after Black A and B won't change the number
of liberties of the group, unlike what happens in the Nakade #2, where
the capture effectively loses liberties. This won't happen for the
higher order cases, where capturing on the initial atari is the only
correct move and does effectively grant more liberties to White.
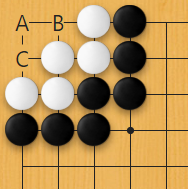
Maybe this formulation will become clearer when we examine the next
use case, the 4-stone dead clump. Black plays B,
A and C and then enters the transition to
the previous case in the recursion. So, we will have:
\[ \begin{align} &stones \ played \ initially - 1 \ transition \\ &+ previous \ case \ in \ the \ recursion \\ &=3 - 1 + 3 = 5 \ liberties \end{align} \]
If you go through the end of the sequence, counting the overlapping transitions as only 1 move, you will end up with the same value of 5 — and that reasoning is described in the SGF as well.
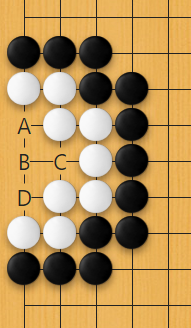
I hope the recursion has become clearer by now. But let's take a look
at the next important case, the 5-stone dead clump. Black plays
B, C, A and D, and
then White resets the position to the previous case in the recursion.
Again, we have the formula:
\[ \begin{align} &stones \ played \ initially - 1 \ transition \\ &+ previous \ case \ in \ the \ recursion \\ &= 4 - 1 + 5 = 8 \ liberties \end{align} \]
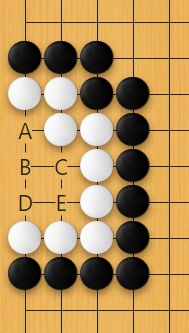
So far, from what we've seen, we have the sequence \[ 1, 2, 3, 5, 8 \], which coincides with the Fibonacci sequence quite neatly and naturally, but can we really say that for all cases? The examples shown above are pretty much 95% of all you will encounter in games. But there's still one important use case missing, the Rabbitty Six, let's take a look at it.
I have to thank Simão Gonçalves for pointing out the exception to the Fibonacci reasoning that is the Rabbitty Six, otherwise my conclusion would have simply been an oversimplification. He has also thoroughly reviewed the whole article, something I'm even more thankful for.
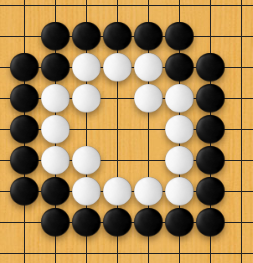
Black plays A, B, D,
E and F before White resets the position and
we get the previous case in the recursion. So, again, we can apply the
formula:
\[ \begin{align} &stones \ played \ initially - 1 \\ &transition + previous \ case \ in \ the \ recursion \\ &= 5 - 1 + 8 = 12 \end{align} \]
You can follow the step-by-step counting through the transitions in the SGF file if you're not convinced.
So, sadly, the capture-recapture with Nakades doesn't follow the Fibonacci sequence to the T, otherwise the Rabitty Six would have 13 liberties. In fact, if you had been paying extra attention, you would have been very suspicious due to the presence of the \( -1 \) in the formula applied previously. Besides, we are not even summing two previous terms, but the previous terms and a new one.
The general formulas are:
\[ \begin{align} \# \ of \ liberties = \ &initial \ clump \ of \ stones \ to \ atari - 1 \ transition \\ &+ previous \ case \ in \ the \ recursion \\ \# \ of \ liberties = \ &total \ stones \ played \ to \ capture \\ &- \# \ of \ forced \ transitions \end{align} \]
The second formula I will call the Absolute Formula because it counts the whole sequence; and the former will be called the Recursive Fomula #1. Alternatively, a more succinct form for them:
\[ \begin{align} &n_L(csa) = csa - 1 + n_L(csa - 1) \\ &n_L = TS - FT \end{align} \]
where \( n_L \) is the number of liberties, \( csa \) is the initial clump of stones up to to the first atari, \( TS \) is the total stones played to capture and \( FT \) is the forced transitions number.
What I call forced transitions are the resets the player trying to save himself has to make in order to gain more liberties and not die immediately, they are basically the only correct move. So, for example, for the 3-stone clump, there are no forced transitions, because we still have only 3 liberties, whether White captures the initial 2 stones or not. The Nakade #2 and the Nakade #1 are also special, base cases and, as usual in almost all cases of recursive dynamics, base cases end up having to be treated differently.
With respect to the absolute formula, it's important to note that \( FT \) could be defined in many different ways, depending on what you call a transition. But that wouldn't really matter much in the end, we would just have to adjust a correcting factor, like a \( +1 \) or \( -1 \) at the end.
Take a look at the table below for a breakdown of the formulas, as applied to each use case:
| \[ \begin{align} &\# \ of \ empty \\ &intersections \end{align} \] | \[ \begin{align} &Recursive \\ &Formula \end{align} \] | \[ \begin{align} &Absolute \\ &Formula \end{align} \] |
|---|---|---|
| \[ 1 \] | \[ 1 \] | \[ 1 \] |
| \[ 2 \] | \[ 2 \] | \[ 2 \] |
| \[ 3 \] | \[ 2 - 1 + 2 = 3 \] | \[ 3 = 2 + 1 \] |
| \[ 4 \] | \[ 3 - 1 + 3 = 5 \] | \[ 3 + 2 + 1 - 1 = 5 \] |
| \[ 5 \] | \[ 4 - 1 + 5 = 8 \] | \[ 4 + 3 + 2 + 1 - 2 = 8 \] |
| \[ 6 \] | \[ 5 - 1 + 8 = 12 \] | \[ 5 + 4 + 3 + 2 + 1 - 3 = 12 \] |
From the 3-stone clump on, you could also think it as — for the recursive formula —:
\[ \begin{align} \# \ of \ liberties = \ &empty \ intersections \\ &- 2 + previous \ case \ in \ the \ recursion \end{align} \]
Why subtract 2? Because you're gonna play, up to the atari, all of the
intersections except for 1, and you have to account for the
overlapping transition. Let's call this last version of the formula
Recursive Formula #2
If you look closely, you're going to spot, from the absolute formula, an Arithmetic Progression (AP) starting from 1, with common difference of 1. For example, add 2 to the calculation of the Nakade #6 and subtract 2 from the -3, then cancel the new -5 with the first 5:
\[ \begin{align} n_L(6) &= (5 + 4 + 3 + 2 + 1) + 2 - 3 - 2 \\ &= (5 + 4 + 3 + 2 + 1) + 2 - 5 \\ &= (4 + 3 + 2 + 1) + 2 \\ &= S_{AP}(4) + 2 \\ &= S_{AP}(ei - 2) + 2 \\ &= \frac{(6 - 2) (6 - 2 + 1)}{2} + 2 = 12 \end{align} \]
So, another way to look at the whole is:
\[ n_L(ei) = \frac{(ei - 2) (ei - 1)}{2} + 2 \]
where \( ei \) is the total number of empty intersections internally.
Where does the \( +2 \) come from? Essentially from the Nakade #2 base case, I would say. And I can see many other formulas popping out from that point of view.
The last, AP-based, formula can even account for values as low as \( 2 \ ei \) apparently:
| \[ ei \] | \[ AP-based \ formula \] |
|---|---|
| 1 | \[ 1 \] |
| 2 | \[ (0 \cdot 1) / 2 + 2 = 0 + 2 = 2 \] |
| 3 | \[ (1 \cdot 2) / 2 + 2 = 1 + 2 = 3 \] |
| 4 | \[ (2 \cdot 3) / 2 + 2 = 3 + 2 = 5 \] |
| 5 | \[ (3 \cdot 4) / 2 + 2 = 6 + 2 = 8 \] |
| 6 | \[ (4 \cdot 5) / 2 + 2 = 10 + 2 = 12 \] |
Hypothetically, if there were bigger dead clumps, we could use these formulas to calculate their liberties, and their results should all coincide:
| \[ ei \] | \[ \begin{align} &Recursive \\ &Formula \ \#1 \end{align} \] | \[ \begin{align} &Recursive \\ &Formula \ \#2 \end{align} \] | \[ \begin{align} &Absolute \\ &Formula \end{align} \] | \[ \begin{align} &AP \\ &Formula \end{align} \] |
|---|---|---|---|---|
| 7 | \[ \begin{align} &6 - 1 + \\ &12 = 17 \end{align} \] | \[ \begin{align} &7 - 2 + \\ &12 = 17 \end{align} \] | \[ \begin{align} &6 + 5 + 4 \\ &+ 3 + 2 + 1 \\ &- 4 = 17 \end{align} \] | \[ \begin{align} &(5 \cdot 6) / 2 \\ &+ 2 = 17 \end{align} \] |
| 8 | \[ \begin{align} &7 - 1 + \\ &17 = 23 \end{align} \] | \[ \begin{align} &8 - 2 + \\ &17 = 23 \end{align} \] | \[ \begin{align} &7 + 6 + 5 \\ &+ 4 + 3 + 2 \\ &+ 1 - 5 = 23 \end{align} \] | \[ \begin{align} &(6 \cdot 7) / 2 \\ &+ 2 = 23 \end{align} \] |
| 9 | \[ \begin{align} &8 - 1 + \\ &23 = 30 \end{align} \] | \[ \begin{align} &9 - 2 + \\ &23 = 30 \end{align} \] | \[ \begin{align} &8 + 7 + 6 + \\ &5 + 4 + 3 \\ &+ 2 + 1 - 6 = 30 \end{align} \] | \[ \begin{align} &(7 \cdot 8) / 2 \\ &+ 2 = 30 \end{align} \] |
| 10 | \[ \begin{align} &9 - 1 + \\ &30 = 38 \end{align} \] | \[ \begin{align} &10 - 2 + \\ &30 = 38 \end{align} \] | \[ \begin{align} &9 + 8 + 7 + 6 \\ &+ 5 + 4 + 3 + 2 \\ &+ 1 - 7 = 38 \end{align} \] | \[ \begin{align} &(8 \cdot 9) / 2 \\ &+ 2 = 38 \end{align} \] |
Pragmatically, I think that any player would rather use the recursive
formulation
As an appendix, we have the
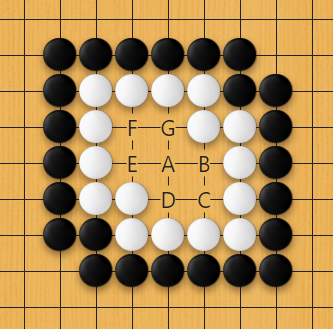
Butterfly Seven,
which is the first shape where we can finally find life, more
specifically, a seki. Black A is followed by White
G, then Black E and White D or
B. I can't guarantee weird shapes with even weirder dead
black stones inside would be all alive, but I think that 99.99% of the
cases are covered by stopping our analysis of liberties at the
Butterfly Seven.
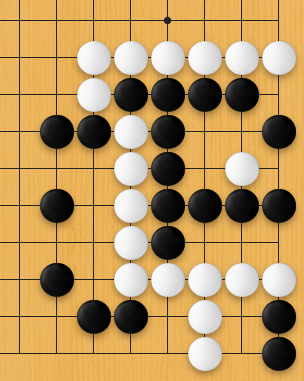
Congratulations on reading up to here. I bet most have quit after I mentioned counting liberties. As a prize, you get the coveted honor of solving a tsumego. I know, I know, and I agree: there aren't enough of those in this world, am I right?
Anyway, I really doubt a 1 or 2 dan can solve this easily and with certainty. Finding the correct answer is not that hard, but proving it correct is a whole other level. And that level will open the door to easily solving even more complicated capturing races.
The SGF with the answer and a complete discussion is in the zip file
provided in the introduction. This tsumego is problem #193 of
Wang Zhi et al.'s 1000 Cases of Tsume-Go
Your browser doesn't support the WGo.js Player. Please use a more modern browser, like Brave, Chrome, Firefox or Edge.
In true fairness, do you really need all of that complicated
reasoning? Not really, you could just remember the 6 use-cases above,
the end. But dabbling in this will help you memorize the numbers, and
this type of reasoning is useful for capturing races in general also.
At any rate, demonstrating this to your fellow players will be quite a
pleasant flex
After posting about this on Reddit, some kind and more experienced players pointed me to 2 other resources:
- In the summary section of the Big Eye page of Sensei's Library, other users had already discussed about the AP-based formula I came up with here.
- The Online Encyclopedia of Integer Sequences has the A089071 sequence pointing to the exact recursive reasoning I describe here, though I think mine is more complete 😛. Interestingly and unexpectedly, the registration of the sequence isn't that old: December 2003. Given that Go is 2000+ years old, I would have been very surprised if nobody had ever found about this before me.
Another topic I forgot to mention was the complexity of the growth of the sequence. The AP-based formula — a formula where each item will be the sum of an AP — shows that the liberties grow quadratically with respect to the internal empty intersections, i.e., \( O(ei^2) \). That means it grows faster than most people would have expected, which is probably something close to linear behavior. That's why, when you hear someone scream in pain something like "why does it take forever for this to die?", you should have nothing but compassion.
When originally preparing this article, I and Simão encountered some
unusual shapes which could have also been included here. However, we
were reluctant to because they seemed like exceptions or very odd
rarities. But there's one not-that-uncommon shape we missed, one I
seem to have the opportunity to baptize: the Portal Seven
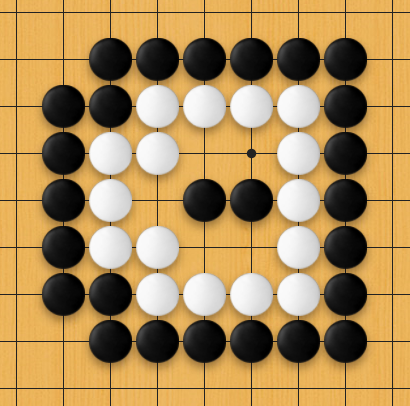
At first, much like me, you will probably think this shape to be incredibly rare. But it isn't that difficult to have it appear in your games actually. Often, though, you will need a series of mistakes or very forceful moves in order to arrive at it, as in the diagram below:
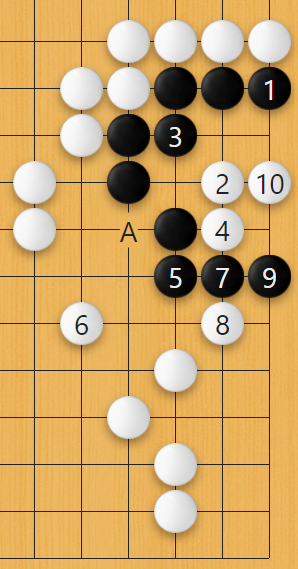
The Portal Seven is basically the next iteration of the formula, so the number of liberties would be the same as a Nakade #7 = 17. But there are already 2 white stones inside in its canonical form, so it actually amounts to 15 liberties, which is nothing short of astounding, at any rate. How many capturing races can you win with that many liberties? A lot of them, for sure.
In the last diagram above, there are already 3 white stones inside, so
the black group has 14 internal liberties instead, and there's also
the question of if Black is gonna be able to get A or
not, otherwise he won't have the complete shape and its liberties
might drastically lower.
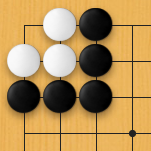
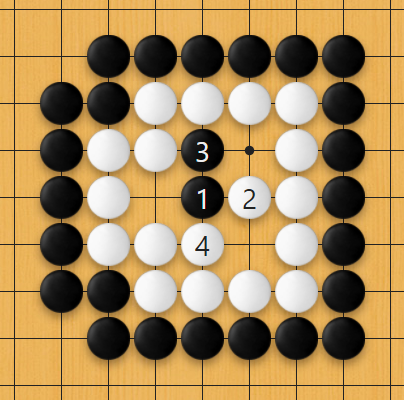
It's worth also noting that a "naked" Portal Seven is not a dead shape actually, as seen below.
You can download a commented SGF for the Portal Seven.