Standard Go Positions with AI Evaluations
Since KataGo is now able to evaluate board positions with points, not only winning percentages, we can now finally compare many positions about which we could only get an idea with professional guess work not too long ago. It is important to note, though, that I'm not sure how reliable AI is in some very niche positions I put it through below, however I have a feeling that it's as close we're gonna get to the "truth".
For example, one question I always had in mind was if standard Japanese handicap positions grew linearly, does it? Take a look at the tables below and you'll get the answer...
I have a pretty beefy PC setup here, but these evaluations will surely not be the end-all-be-all. They are bound to change, specially given that AI is still evolving. However, current evaluation is already leaps ahead what any human is able to offer.
All in all, I believe the difference between the positions or the ordering will be more reliable in the long-term than their numerical values, of course.
I'll try to keep the tables below updated, if anything relevant happens and the evaluations change.
For reference, all of the mentioned positions can be found in.
An important point to take note of is that the AI's values with and without komi are not necessarily the same as adding or subtracting the value of komi. That's because AI also takes certainty of victory or variance into account, i.e., a bigger lead will enable it to play safer moves, it doesn't care at all if the point-wise lead is big.
However, I did run most of the positions below with and without komi in order to check if there are any notable discrepancies, and so far they seem pretty close — not to mention that the hierarchy and relative difference are more important than the numerical values. If you spot anything relevant, though, please let me know.
| Stones | With 6.5 Komi | With 0.5 Komi | ||
|---|---|---|---|---|
| Points | % | Points | % | |
| Even | W+0.2 | W+51.4% | B+4.8 | B+76.3% |
| 2 | B+12.4 | B+95.3% | B+18.4 | B+98.2% |
| 3 | B+24.9 | B+99.3% | B+32.1 | B+99.6% |
| 4 | B+40.3 | B+99.8% | B+47.3 | B+99.9% |
| 5 | B+53.8 | B+99.9% | B+59.9 | B+100% |
| 6 | B+67.7 | B+100% | B+72.8 | B+100% |
| 7 | B+80.4 | B+100% | B+83.8 | B+100% |
| 8 | B+93.2 | B+100% | B+96 | B+100% |
| 9 | B+105.3 | B+100% | B+107.3 | B+100% |
Now you know how many points in reverse komi each handicap is worth! Maybe this is ruining some bets?
From the table above, we can see that growth is indeed more or less linear, which is suprising at least to me, since I've always thought that some handicap transitions were much steeper than others. Which is actually true, but not by that much. Most notably, in my opinion, is the jump from 3 to 4 stones, where we get more than 15 points — with or without komi —, which is likely due to the fact that there are no available corners left when past 4 stones. Also do note that some positions with and without komi have scores within 2-3 points of each other, much less than komi.
It is also important to note that no komi brings the winning
percentage close to a 3:1 proportion, so perhaps we could say that's
the minimum necessary proportion to distinguish one player from
another? And, more importantly, having a 2-stone handicap with komi
represents bigger value for Black than having an even game without
komi, which does not coincide with what I've heard for years from
strong players
| Position | With 6.5 Komi | With 0.5 Komi | ||
|---|---|---|---|---|
| Points | % | Points | % | |
| Sunjang Baduk | W+0.6 | W+53.1% | B+3.6 | B+68.9% |
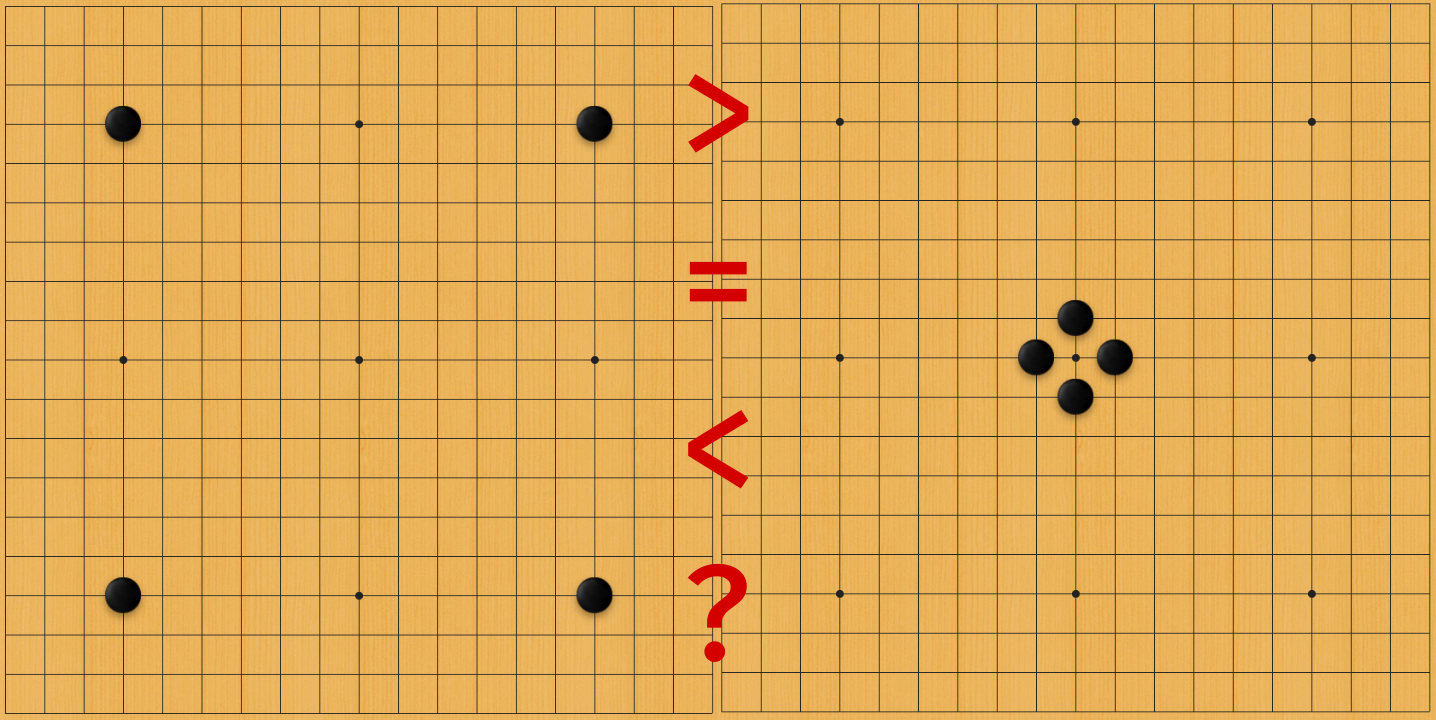
| Cross Hoshis | W+0.3 | W+51.7% | B+4.7 | B+77% |
| Parallel Hoshis | W+0.2 | W+50.8% | B+4.7 | B+76.9% |
| Tengen | W+1.2 | W+56.9% | B+2.9 | B+67.4% |
| Black 4-4 + White Tengen | B+1.6 | B+59.8% | B+8.3 | B+87.4% |
| Ponnuki-in-the-Center Handicap | B+21.2 | B+98.6% | B+28.6 | B+99.4% |
|
Chinese 3-Stone Handicap |
B+23.4 | B+99% | B+30.8 | B+99.5% |
| Ponnuki Around the Corner Hoshi | W+13.8 | W+96.4% | W+7.8 | W+85.8% |
| Empty Triangle in One Corner | W+10.5 | W+91.7% | W+3.1 | W+67.3% |
| B2-Bomber in One Corner | W+32.5 | W+99.7% | W+28 | W+99.4% |
| Side Hoshi | W+0.9 | W+55.4% | B+3.6 | B+70.6% |
| Center of 4 Hoshis | W+1.2 | W+57% | B+2.9 | B+67.3% |
| Pass | W+12.3 | W+94.4% | W+6.1 | W+81.8% |
| 1-1 | W+13.7 | W+95.2% | W+7.6 | W+85.5% |
| 2-2 | W+5 | W+74.5% | B+0.2 | B+52% |
| 6-4 | W+0.8 | W+54.9% | B+3.6 | B+70.7% |
| 6-3 | W+0.7 | W+54.4% | B+3.9 | B+71.9% |
| 5-5 | W+0.9 | W+55.6% | B+3.3 | B+69.4% |
| 5-4 | W+0.3 | W+52.1% | B+4.5 | B+74.7% |
| 5-3 | W+0.4 | W+52.4% | B+4.5 | B+74.9% |
| 3-3 | W+0.4 | W+52.5% | B+4.6 | B+76.2% |
| 4-4 | W+0.1 | W+51% | B+4.9 | B+76.9% |
| 3-4 | W+0.1 | W+50.9% | B+4.9 | B+77.1% |
I think every player should thank the stars for tengen being only a
1-point loss, otherwise we would see a gigantic surge in Mirror
Go
Years ago, I played a game where I exchanged a 4-stone handicap for a
ponnuki in the center, just for the fun and curiosity. After the game,
I felt duped
And how about an infamous triad of artificial handicap in: empty triangle in one corner; side hoshi; and center of 4 hoshis? I've seen many games where the stronger player plays one of these as an opener more or less as a statement. The statement is not strong at all, is it though? The B2-Bomber in one corner is a whole other story, since there are way more pass-like moves in it, in the end it's almost as bad as its article on Sensei's Library is funny.
Sensei's Library has a page with a lot of variety on this topic, and I will not cover all the variations here.
After collecting the data, we can see that, for the most part, we still do have (more or less) linear growth of 12-15 points per stone, so handicaps beyond 9 stones are actually quite feasible and reasonable, I guess. Also do note that KataGo is apparently having trouble to evaluate these positions with respect to komi.
| Handicap | With 6.5 Komi | With 0.5 Komi | ||
|---|---|---|---|---|
| Points | % | Points | % | |
| Japanese 10-Stone | B+118.7 | B+100% | B+119.7 | B+100% |
| Japanese 11-Stone | B+132.7 | B+100% | B+134.5 | B+100% |
| Japanese 12-Stone | B+147.7 | B+100% | B+147 | B+100% |
| Japanese 13-Stone | B+160.6 | B+100% | B+160 | B+100% |
| Japanese 14-Stone | B+173.7 | B+100% | B+172.9 | B+100% |
| Japanese 15-Stone | B+186.7 | B+100% | B+185.6 | B+100% |
| Japanese 16-Stone | B+201.2 | B+100% | B+200.6 | B+100% |
| Japanese 17-Stone | B+213.5 | B+100% | B+213.1 | B+100% |
| Japanese 18-Stone | B+223.9 | B+100% | B+226.6 | B+100% |
| Japanese 19-Stone | B+235.2 | B+100% | B+236.6 | B+100% |
| Japanese 20-Stone | B+248.2 | B+100% | B+251 | B+100% |
| Japanese 21-Stone | B+257.4 | B+100% | B+263.6 | B+100% |
| Chinese 10-Stone | B+117.9 | B+100% | B+119.5 | B+100% |
| Chinese 11-Stone | B+130.8 | B+100% | B+131.8 | B+100% |
| Chinese 12-Stone | B+145.8 | B+100% | B+145.4 | B+100% |
| Chinese 13-Stone | B+159 | B+100% | B+157.7 | B+100% |
| Chinese 14-Stone | B+173.1 | B+100% | B+172.3 | B+100% |
| Chinese 15-Stone | B+183.9 | B+100% | B+182.8 | B+100% |
| Chinese 16-Stone | B+194.6 | B+100% | B+194.9 | B+100% |
| Chinese 17-Stone | B+208.7 | B+100% | B+207.3 | B+100% |
| Position | With 6.5 Komi | With 0.5 Komi | ||
|---|---|---|---|---|
| Points | % | Points | % | |
| Sanrensei | W+0.5 | W+53.6% | B+4 | B+72.8% |
| Kobayashi | W+0.5 | W+53.2% | B+4.1 | B+73.4% |
| Chinese | W+0.5 | W+53% | B+4.3 | B+74% |
| High Chinese | W+0.6 | W+53.7% | B+4.1 | B+72.8% |
| Mini Chinese | W+0.5 | W+53% | B+4.3 | B+74.3% |
| Micro Chinese | W+0.4 | W+52.1% | B+4.6 | B+75.1% |
| Double Parallel 5-5s | W+2.4 | W+63.9% | B+1.6 | B+59.9% |
| Double-Alternated 5-3s | W+1.1 | W+56.8% | B+3.3 | B+69.8% |
| Double-Parallel 5-3s | W+1.1 | W+57% | B+3.2 | B+68.5% |
| Double-Alternated 5-4s | W+0.7 | W+54.7% | B+3.5 | B+70.3% |
| Double-Parallel 5-4s | W+1.3 | W+57.9% | B+2.8 | B+66.7% |
| Double-Alternated 6-4s | W+1.3 | W+57.7% | B+3.1 | B+68% |
| Double-Parallel 6-4s | W+1.3 | W+57.7% | B+2.8 | B+66.7% |
| Double-Alternated 6-3s | W+1.5 | W+59% | B+2.6 | B+65.7% |
| Double-Parallel 6-3s | W+1.5 | W+58.7% | B+2.7 | B+66.2% |
| Black Hole | W+7.1 | W+81.8% | W+0.8 | W+54.1% |
| Great Wall | W+10.1 | W+92.1% | W+3.3 | W+69.3% |
| Magic Box | W+7.8 | W+85.2% | W+1.6 | W+59% |
| Tengen + All Side Hoshis | W+8 | W+88.5% | W+1.7 | W+60.9% |
| Alternated Hoshis to Tengen | W+1.3 | W+57.4% | B+2.9 | B+67.6% |
| Go Seigen's Tengen + 3-3 + 4-4 | W+1.4 | W+58.6% | B+2.8 | B+67.4% |
| AlphaGo's Black 2-Space High Shimari + 4-4 | W+0.1 | W+50.6% | B+4.9 | B+76.7% |
| Standard 3-4 Shimari + 4-4 | W+0.2 | W+57.1% | B+4.7 | B+76.4% |
| Standard 3-4 Shimari + 3-4 | W+0.2 | W+51.7% | B+4.8 | B+76.8% |
| 4-4 + White 3-3 Direct Invasion | B+0.5 | B+53.4% | B+6.3 | B+81.5% |
| Parallel & Alternated 3-4s | W+0.2 | W+51.3% | B+5 | B+76.9% |
| Parallel & Facing 3-4s | W+0.1 | W+50.9% | B+4.9 | B+76.8% |
| White's Parallel and Facing 3-4s | W+0.1 | W+50.7% | B+4.7 | B+76% |
As we can see, by playing reasonable moves, it's very unlikely you're gonna be behind, or at least not too far behind. Nothing new there.
Nonetheless, there are some surprises in this last table. For instance, double 5-3 or 5-4 are basically the same as double 6-3 or 6-4. And having them parallel or alternated is essentially the same thing, which defies classic wave-like arguments.
Some of the very weird openings like the Black Hole, the Great Wall, and the Magic Box are, as expected, bad. But that didn't stop Cho U 9p and So Yokoku 9p from winning against other strong pros with gargantuan holes in the process.
Three other relevant mentions are Go Seigen's Tengen + 3-3 + 4-4; Alternated Hoshis to Tengen; and 4-4 + White 3-3 Direct Invasion. Go Seigen's Tengen + 3-3 + 4-4 is really tight in terms of points, a 1-point loss basically. Alternated Hoshis to Tengen, which resembles Mirror Go, is also very similar to tengen itself, only a 1-point loss — instead of tengen for the final hoshi, Black should invade the diagonal 3-3, and the game should remain as even as it could be. And perhaps the only surprise is the 4-4 + White 3-3 Direct Invasion, which I thought would be pretty much even, but is a little bit more than a 1-point loss for White.
| Position | With 6.5 Komi | With 0.5 Komi | ||
|---|---|---|---|---|
| Points | % | Points | % | |
| Initial Position | W+0.4 | W+53.6% | B+5.4 | B+90.9% |
| Tengen | W+1.5 | W+65.7% | B+2.7 | B+77.9% |
| 3-3 | W+0.8 | W+58.5% | B+4.5 | B+88.7% |
| 3-4 | W+0.4 | W+55% | B+5 | B+90.5% |
| 4-4 | W+0.4 | W+54.5% | B+5 | B+90.2% |
| 5-4 | W+0.7 | W+58.4% | B+4.1 | B+86.6% |
| 5-3 | W+0.7 | W+58.3% | B+4.3 | B+87.8% |
| 6-3 | W+0.8 | W+58.6% | B+4.2 | B+86.6% |
| 6-4 | W+0.9 | W+59.9% | B+3.9 | B+85.1% |
| 5-5 | W+1.2 | W+63% | B+3.3 | B+82.2% |
| 2-2 | W+5.3 | W+88.7% | B+0.1 | B+52.8% |
| 1-1 | W+13.3 | W+99% | B+7.3 | B+95.9% |
| Pass | W+12.1 | W+98.9% | W+6.2 | W+94% |
| Side Hoshi | W+1.1 | W+61.8% | B+3.6 | B+83.5% |
| 2-Stone Handicap | B+12.7 | B+99.1% | B+19.4 | B+99.7% |
| 3-Stone Handicap | B+24.7 | B+99.9% | B+31.9 | B+100% |
| 4-Stone Handicap | B+40.5 | B+100% | B+46.7 | B+100% |
| 5-Stone Handicap | B+49.8 | B+100% | B+56.6 | B+100% |
| 6-Stone Handicap | B+65.2 | B+100% | B+69.5 | B+100% |
| 7-Stone Handicap | B+73.9 | B+100% | B+80.2 | B+100% |
| 8-Stone Handicap | B+88.3 | B+100% | B+92 | B+100% |
| 9-Stone Handicap | B+94 | B+100% | B+101.4 | B+100% |
So, apparently, 6.5 is indeed the appropriate komi for the 13x13 board, and White gets basically the same advantage as on the 19x19 board.
This time, handicap does not progress linearly at all, with some jumps being near double others.
Tengen is again only a 1-point loss. And, again, AIs tend to use tengen for invading and attacking directly, not to build moyos, specially on the 13x13 board, where there isn't much space or time to build moyos anyway.
Most initial moves are valued pretty similarly to the 19x19 board, but the loss is generally slightly bigger.
In handicap games, as expected, the winning percentages grow rapidly to 100%, in fact, we only need a 2-stone handicap in order to get to 99%. Interestingly, a 9-stone handicap is not enough to get us to killing the whole board or something close to it, probably because there are still four 3-3 invasions. Still, B+94 is 55% of the available 169 points, when compared to the 105/361 = 29% in the 19x19 board's 9-stone handicap.
| Position | With 6.5 Komi | With 0.5 Komi | ||
|---|---|---|---|---|
| Points | % | Points | % | |
| Initial Position | W+0.3 | W+58% | B+5.2 | B+97.9% |
| Tengen | W+0.3 | W+56.3% | B+5.2 | B+97.2% |
| 3-3 | W+1.7 | W+79.8% | B+2.8 | B+91.3% |
| 3-4 | W+0.6 | W+63.3% | B+4.7 | B+97% |
| 4-4 | W+0.2 | W+56.2% | B+5.2 | B+97.4% |
| 5-4 | W+0.2 | W+54% | B+5.1 | B+97.4% |
| 5-3 (Side Hoshi) | W+0.2 | W+55.1% | B+4.3 | B+96.1% |
| 2-2 | W+6.3 | W+98% | W+0.2 | W+53.2% |
| 1-1 | W+13.6 | W+99.8% | W+7 | W+98.6% |
| Pass | W+12.1 | W+99.8% | W+6.2 | W+98.4% |
| 2-Stone Handicap | B+9.2 | B+99.2% | B+16.6 | B+99.8% |
| 3-Stone Handicap | B+20.9 | B+99.8% | B+28.8 | B+99.9% |
| 4-Stone Handicap | B+43.4 | B+99.4% | B+48.4 | B+99.5% |
| 5-Stone Handicap | B+64.1 | B+99.3% | B+71.2 | B+99.4% |
I've always thought komi should be smaller than 6.5 in the 9x9 board, since it is so difficult to combat it as Black, it's much easier to live than to kill in Go after all. And I've heard stories that Japanese pros were of the same accord. However, it seems as though AI thinks 6.5 is best.
Similarly to the 13x13 board, handicap again does not progress
linearly at all. It seems more and more likely that the 19x19 board is
a special size, or perhaps an inflection point for linearity? From
some brief attempts with other board sizes, the 13x13 seems to be
actually closer to the inflection point of linearity, in my opinion.
For example, the 15x15
For those inexperienced with the 9x9 at higher levels, it's worth noting that the 3-3 and the 3-4 are not enough for Black. Better play demands either 4-4 or tengen, but the 5-3 is also pretty sharp as well, according to AI.
Again, the winning percentage grows sharply towards 100% in handicap games, only 2 stones is enough to nearly guarantee a win. Nevertheless, to my surprise, a 5-stone handicap is deemed as not enough to kill White wherever. I believe the AI thinks White can find a ko somehow. Point-wise, it's still a humongous advantage, 64/89 = 72% of the points initially available on the board.
The tables below are just a little bit beyond a curiosity, not much more. It's nice to see all the numbers side to side, though.
The term % of initial points on the board is basically the estimated score by the AI divided by the "size" of the board which are, for the 9x9, 13x13, and 19x19, respectively: 81, 169, and 361.
| Handicap | Points | % (Winning Rate) | % of Initial Points on the Board | ||||||
|---|---|---|---|---|---|---|---|---|---|
| 9x9 | 13x13 | 19x19 | 9x9 | 13x13 | 19x19 | 9x9 | 13x13 | 19x19 | |
| Even | W+0.3 | W+0.4 | W+0.2 | W+58% | W+53.6% | W+51.4% | W+0.37% | W+0.23% | W+0.06% |
| 2 | B+9.2 | B+12.7 | B+12.4 | B+99.2% | B+99.1% | B+95.3% | B+11.3% | B+7.5% | B+3.4% |
| 3 | B+20.9 | B+24.7 | B+24.9 | B+99.8% | B+99.9% | B+99.3% | B+25.8% | B+14.6% | B+6.9% |
| 4 | B+43.4 | B+40.5 | B+40.3 | B+99.4% | B+100% | B+99.8% | B+53.5% | B+24% | B+11.1% |
| 5 | B+64.1 | B+49.8 | B+53.8 | B+99.3% | B+100% | B+99.9% | B+79.1% | B+29.5% | B+14.9% |
| 6 | — | B+65.2 | B+67.7 | — | B+100% | B+100% | — | B+38.6% | B+18.8% |
| 7 | — | B+73.9 | B+80.4 | — | B+100% | B+100% | — | B+43.7% | B+22.3% |
| 8 | — | B+88.3 | B+93.2 | — | B+100% | B+100% | — | B+52.2% | B+25.8% |
| 9 | — | B+94 | B+105.3 | — | B+100% | B+100% | — | B+55.6% | B+29.1% |
| Handicap | Points | % (Winning Rate) | % of Initial Points on the Board | ||||||
|---|---|---|---|---|---|---|---|---|---|
| 9x9 | 13x13 | 19x19 | 9x9 | 13x13 | 19x19 | 9x9 | 13x13 | 19x19 | |
| Even | B+5.2 | B+5.4 | B+4.8 | B+97.9% | B+90.9% | B+76.3% | B+6.4% | B+3.2% | B+1.3% |
| 2 | B+16.6 | B+19.4 | B+18.4 | B+99.8% | B+99.7% | B+98.2% | B+20.5% | B+11.5% | B+5.1% |
| 3 | B+28.8 | B+31.9 | B+32.1 | B+99.9% | B+100% | B+99.6% | B+35.6% | B+18.9% | B+8.9% |
| 4 | B+48.4 | B+46.7 | B+47.3 | B+99.5% | B+100% | B+99.9% | B+59.8% | B+27.6% | B+13.1% |
| 5 | B+71.2 | B+56.6 | B+59.9 | B+99.4% | B+100% | B+100% | B+87.9% | B+33.5% | B+15.7% |
| 6 | — | B+69.5 | B+72.8 | — | B+100% | B+100% | — | B+41.1% | B+20.2% |
| 7 | — | B+80.2 | B+83.8 | — | B+100% | B+100% | — | B+47.5% | B+23.2% |
| 8 | — | B+92 | B+96 | — | B+100% | B+100% | — | B+54.4% | B+26.6% |
| 9 | — | B+101.4 | B+107.3 | — | B+100% | B+100% | — | B+59.8% | B+29.7% |